 The battle for the MP3 players have never been more intensified. With so many different players jostling for a place in the market, it is interesting to bet who the eventual winner is. Of course, the incumbent winner is definitely Apple’s iPod. To see the amount of industry support and interest for this Apple product, you just need to look at the number of accessories designed specifically for the iPod.
And so lately, sick of swapping CDs in my car’s limited 6-disk changer, I decided to hook my iPod to the car and do away with the in-car disk changer. The two criteria that are important to me are:
* Power charging. As iPod runs out of juice pretty quickly, it is a necessity for me to charge it on the road.
* Connect to my in-car stereo without needing to modify my car.
Fortunately, there exist many different solutions that meet my requirements. First, for the power you can use the Belkin Auto Charger for iPod (see Figure 1).
 Figure 1. Belkin Auto Charger w/Audio for iPod
For iPod music playback in your car, there are generally two solutions:
* Use a Car cassette adapter, or
* Use a FM transmitter
According to feedback from a number of users, using a car cassette adapter actually produces better sound quality than using a FM transmitter. You simply plug one end of the adapter into your iPod and slide the cassette adapter into the cassette player in your car. The Sony Car Cassette Adapter is one of them (see Figure 2). Figure 2. The Sony Car Cassette Adapter
For the FM transmitter, it basically broadcast the music from your iPod using one of the selected FM frequencies. To listen to the music, you need to tune your car stereo to the designated frequency. The Griffin iTrip FM transmitter (see Figure 3) connects to the top of iPod and draws its power from the iPod and transmits the music over the selected FM frequency.
 Figure 3. The Griffin iTrip FM Transmitter
Lately, there seems to be a wave of new all-in-one car accessories for the iPod. These all-in-one accessories combined a charger and a FM transmitter into one, making it convenient for car owners. The Monster iCarPlay Wireless is one of them (see Figure 4). Figure 4. Monster iCarPlay Wireless - FM Transmitter for iPods
After a long search at the local Apple Stores, I settled for an all-in-one solution from Griffin – the Griffin RoadTrip. The Griffin RoadTrip is both a charger and a FM transmitter for iPod and iPod Mini.
In this article, I will share with you my experience of setting up the Griffin RoadTrip in my car and how you can use your car stereo to play music stored on your iPod.
What You Need
Here is a list of things you need:
* Griffin RoadTrip (http://www.griffintechnology.com/products/roadtrip/)
* 3rd/4th Generation iPod or iPod Mini
* Car (of course!)
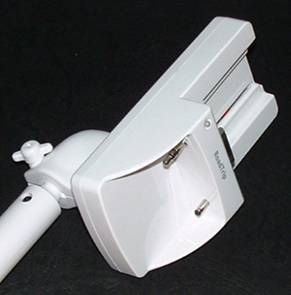
The Griffin RoadTrip cost about $80. For this article, I used my 3rd generation 20 GB iPod. The Griffin RoadTrip connects to the cigarette lighter of your car. Figure 5 shows the main parts of the Griffin RoadTrip.
 Figure 5. The Griffin RoadTrip
Let’s examine the various parts of the Griffin RoadTrip in more details. Figure 6 show the cradle with the removable FM radio transmitter module.
 Figure 6. The cradle with the FM Transmitter Module
The nice feature about the Griffin RoadTrip is the ability to remove the FM radio transmitter module. Figure 7 shows the cradle with the module removed.
 Figure 7. The cradle with the FM Transmitter Module removed
Using the included cables (see Figure 8), you can connect the FM radio transmitter module to your computer so that the audio output is broadcasted over the FM frequency. One limitation of this is that the radio module requires an external power (drawing from the USB connection from a computer) and it is unable to draw power from an iPod directly. This prevents you from connecting the module to the iPod directly.
 Figure 8. The FM Transmitter Module with cables
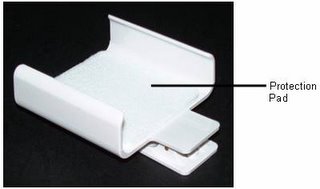
The Griffin RoadTrip comes with a holder to hold your iPod (see Figure 9). It also doubles up as a belt clip. Depending on the size (and thickness) of your iPod, you may need to stick the included protection pad to the holder so that it can snugly fit your iPod. Figure 9. The iPod holder/belt clip with the protection pad
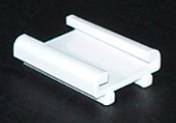
For iPod Mini users, use the clip holder for the iPod Mini instead (included in the package, see Figure 10).
 Figure 10. Clip holder for iPod Mini
Figure 11 shows my iPod in the holder.
 Figure 11. The iPod in the holder
With the iPod in the holder, you can now sit it in the cradle (see Figure 12).
 Figure 12. The iPod in the charging cradle
Mounting the Griffin RoadTrip
With the components all set up, it is now time to mount it in the vehicle. First locate the cigarette lighter outlet (see Figure 13). Depending on the make of your car, the positioning of your cigarette lighter outlet may affect your positioning of the Griffin RoadTrip.
 Figure 13. Locating the cigarette lighter outlet
One thing I realized when I was mounting the Griffin RoadTrip is that with the extension arm it feels really fragile, especially when you are driving. And so I removed the extension arm and mount it into the cigarette lighter outlet (see Figure 14).
 Figure 14. Mounting the Griffin RoadTrip
There were some reviews on the Web that mentioned the Griffin RoadTrip obstructing the gear shifts, but for the Nissan Sunny, this is not a problem (see Figure 15).
 Figure 15. The Griffin RoadTrip does not obstruct the gear shifts of my Nissan Sunny
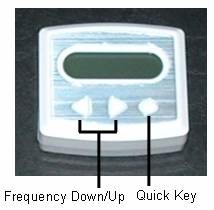
Once the Griffin RoadTrip is mounted, simply turn on the Griffin RoadTrip by pressing and holding the Quick Key (see Figure 16) button. Select a frequency to broadcast the music on your iPod by pressing the Frequency Down/Up buttons.
 Figure 16. The buttons on the FM radio transmitter
Turn on your car stereo and then tune in to the designated frequency. You should now be able to hear the music from your iPod!
Summary
Overall, the Griffin RoadTrip is easy to set up and use. However, if you are particular about sound quality, I need to tell you that some hissing noise can be heard when you are playing from the iPod. However, I find it acceptable and at least I can now hit the road with the company of my favorite songs!
0 comments: