Sailing Simulator Software

Are you looking for Sailing Simulator Software?

Posey Yacht Design offers five different simulators:

  • Advanced Racing Simulator - For Windows 95 or better and Macintosh OS X Power PC and Intel-based Macintosh.
    Now with option to create your own Personal Race Area as well as twelve, popular real-world racing areas.
    Experience high-level racing from the skipper’s perspective in an intelligent 20-boat fleet. 25 different boat types, including New 25 foot Sport Boats, 35 foot Sport Boats, Ideal 18s, and Offshore Catamarans.
    Very realistic boat response to your sail trim, weight placement, steering, and boatspeed adjustments.
    Interactive, animated tutorials teach Racing Rules, racing tactics and strategy.
  • Sailing Tactics Simulator - For Windows 95 or better and Macintosh OS X Power PC and Intel-based Macintosh.
    Now with option to create your own Personal Race Area as well as eighteen, popular real-world racing areas.
    One or two players can match wits against each other, the computer’s expert match racer, or a fleet of 30 aggressively sailed boats.
    25 different boat types, including New 25 foot Sport Boats, 35 foot Sport Boats, Ideal 18s, and Offshore Catamarans.
    Interactive, animated tutorials teach the latest Racing Rules, racing tactics and strategy.
  • Distance Race Sailing Challenge - For Windows 95 or better and Macintosh OS X Power PC and Intel-based Macintosh.
    Compete in 11 different distance races, including Chicago to Mackinac, Vineyard, Chesapeake Governors Cup, Ft. Lauderdale to Key West.
    Emphasis on strategy and boatspeed. Sail in a 20 boat fleet of offshore racers, sprit boats, racer-cruisers, or catamarans, plus high performance ultra light sportboats.
  • Sailing Dynamics Instructor - For Windows 95 or better and Macintosh OS X Power PC and Intel-based Macintosh.
    Novice and intermediate sailors can learn the fundamentals of sailing, rules of the road, and fine points of sail trim. As you build skills, progress to racing basics. Practice sail shaping and boat handling techniques.
    Brush up on the latest Racing Rules. Includes expanded interactive sailing skill and racing tutorials, sailing simulator, and racing simulator.
    Sail Optimists, catamarans, skiffs, dinghies, keelboats, cruising sloops, and offshore racers, plus high performance offshore catamarans and ultra light sport boats.
  • Coastal Cruising Simulator -
    For Windows 95 or better and Macintosh OS X Power PC and Intel-based Macintosh.
    Practice essential cruising skills as you enjoy up to a five-day cruise or passage in a wide variety of cruising grounds.
    Captain monohulls, multihulls, motorsailers, or trawler yachts.
    Navigate using modern equipment or dead reckoning. Docking Practice Simulation included.

You use the keyboard or mouse to operate the simulation boat.

All software runs on Windows 95 + systems and Macintosh Native OS X and Classic versions.


More Info:
Posey Yacht Design

New Generation of Digital Stethoscopes

The ultimate in stethoscope sound quality.
Adjust volume for faint heart sounds, obese patients, noisy work environments, etc.

It will greatly improve the diagnosis of sublte murmurs, or taking blood pressure.

Suitable for students or academic research recordings, the ds32a sets new standards in electronic stethoscope audio quality and ease-of-use.


Capturing the Sound - The Electromagnetic Diaphragm (EmD)
Capturing heart and lung sounds is the most critical aspect of stethoscope design.
Acquire the sound accurately, and anything is possible.
The patented Electromagnetic Diaphragm (EmD) is unique to a Thinklabs stethoscope, and is the key to audio quality.

Audio Transmission 100% End-to-End Electronics
Having captured an accurate signal, electronic signal transmission right to the eartips ensures crisp clear sound.
A simple experiment with your conventional stethoscope shows you why you need End-to-End Electronics.


More Info:
Thinklabs

iTech Virtual Laser Keyboard

iTech Virtual Laser Keyboard


In the size of a Zipo lighter and in an outer spaced "enterprise" style, the iTech Virtual Laser Keyboard uses a laser beam to generate a full-size OPERATING laser keyboard that smoothly connects to MAC's, Smart Phones, the new Blackberry (8100,8300,8800), Any kind of PC and Most of the handheld devices (PDA's, tablet PC's).

The I-Tech laser keyboard acts exactly like any other "ordinary" keyboard: A direction technology based on an optical recognition mechanism enables the user to tap on the projected key images, while producing real tapping sounds.

In this video Brian West shows Sean McHose the bluetooth iTech Virtual Laser Keyboard.


<

CD Library II

At Fox 7's "Inspector Gadget", Brian West shows Sean McHose how to take charge of his CD/DVD collection with the CD Library II from Dacal.

Connect this USB library to your Windows compatible computer, load the software, enter the names of the CD/DVDS, insert them into the carousel and you now have an automated system that can quickly find any CD/DVD in your collection.


Infrared Marine Thermometer

Infrared Marine Thermometer
Did you know that most water temperature meters take up to 1 minute to give you an accurate reading?
How are you going to pinpoint the optimal temperature habitat for your prey with a 1 minute delay?

The NorCross® Infrared Marine Thermometer SP delivers instant temperature readings of any surface with one-handed operation.
Use it to:
  • Take water temperature readings while racing to the fishing grounds; no matter how fast you’re running. Instantly measure powerhead, riser, block, etc. temperatures or pinpoint water circulation problems.
  • Check the bearing and brake temperatures of your trailer and avoid the unwanted hassles of improper lubrication or failed seals.
Take it with you no matter where you go and don’t worry, it’s made marine-proof and water resistant.

To Use: Just aim at the target with the integrated laser pointer and press the measure button. Temperature readings will appears within a ½ second and will continue to update 4 times per second until the button is released

Available from:
NorCross

The Loremo

Loremo
German Loremo AG introduced their ultra efficient car at the 76th annual Motor Show 2006 in Geneva last month, the Loremo.
Founded in Munich in 2000, Loremo AG is a German automaker corporation, focused on designing and manufacturing cars with very low weight and air resistance. The term "Loremo" is an abbreviation for Low Resistance Mobile.

The company has developed a light-weight passenger car with outstanding erodynamics. The one, two combination of light weight and tunnel tested aerodynamics allow this energy-efficient car to travel 157 miles per gallon of gasoline or 1.5 l per 100km.

The idea is simple: Weight and aerodynamic resistance have fundamental influence on the fuel consumption of vehicles. Reducing these factors reduces the consumption rates. This fact is known from motor sports, where the main focus lies on the weight reduction. Therefore the secret of Loremo is concentration on the essential: Safety, economy, driving pleasure and design.

The innovative linear cell structure is the basis of Loremo’s safety. Instead of two doors on the side there is a “gate”. A wing door that swings upward and to the front. The gate also reveals a baggage compartment where you can find additional room.
And in case you need to transport something larger, the huge rear trunk offers lots of space. You can also quickly make room for two children by folding back the two rear seats.

The ergonomically designed interior makes a clear statement: concentration on the essential, transferred with elaborate design, style and pleasant feel.

The dashboard yields a simplistic instrument tower with display.
The bucket seats are only vertically adjustable.
Instead of a horizontal adjustment of the seats the pedals and steering wheel are adjustable to ergonomically suit the driver.
The rear seats are arranged against driving direction and provide a high safety standard for children.


LOREMO LS LOREMO GT
Engine 2-Cylinder-Turbo-Diesel 3-Cylinder-Turbo-Diesel
Output 15 kW / 20 HP 36 kW / 50 HP
V max 160 km/h 200 km/h
Acceleration <> <>
Gearbox 5-gear-manual / automatic 5-gear-manual / automatic
Drive Mid engine / Rear wheel drive
Mid engine / Rear wheel drive
Fuel consumption
<> <>
Range > 1.000 km (20-l-Tank) > 700 km (20-l-Tank)
Weight <> <>
Aerdynamic drag Cw=0,22 Cw=0,22
Seating 2+2 2+2
Measurements (l x w x h) 380 cm x 136 cm x 114 cm 380 cm x 136 cm x 114 cm
Price <> <>
Standard equipment
Airbags, particulate filter, radio
Optional equipment
On-Board-PC, A/C, MP3-Player,
Navigation system
On-Board-PC, A/C, MP3-Player,
Navigation system


The Loremo

Delicious Library

By Wei-Meng Lee

If you are a book-lover (or a DVD collector) like me, you would no doubt have a huge collection of books. The problem that most people encounter is how to really organize their collections. People in the early days use spreadsheets to keep track of what titles they have, but doing so is really a hassle as you have to key in all the data yourself.

Recently I came across a very cool cataloguing application that prompted me to revisit my desire to organize my home library again. And so, in this article I am going to walk you through the Delicious Library application ($39.95) from Delicious Monster (http://www.delicious-monster.com/). Delicious Library is a Mac OS X application that catalogues your personal collection of books, DVDs, CDs, and games. It does so by scanning the barcode of the item and then access the Amazon.com web service to fetch the detail information of the item.

Barcoding Scanning using your iSight or Webcam

The first thing that the Delicious Library really impresses me was its ability to scan in barcodes using your iSight camera. However, if you do not have an iSight camera, fret not. You can still use your Webcam to scan in barcodes. You would however need to do some work to get your Webcam to work in Mac OS X (refer to my earlier article at http://www.macdevcenter.com/pub/a/mac/2003/12/23/usb_webcam.html on how to do this).

Once Delicious Library is installed, click on the Video Barcode Scanner button (see Figure 1) located at the bottom of the screen to start scanning your items!

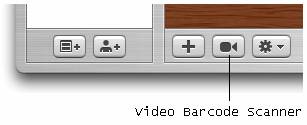
Figure 1. Click on the Video Barcode Scanner to start scanning your item

The first time you try to scan in a barcode requires some effort. For me, I placed the Webcam on the desk and held the item upright (in this case a book; see Figure 2). The trick to getting the book scanned is to do this in a brightly lit place and make sure that you keep your book still in order for the barcode to be captured successfully.

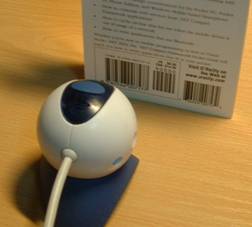
Figure 2. Scanning a barcode using the webcam

Ensure that your barcode is crossed by at least one of the red lines (see Figure 3). If you hear a beep sound, then the barcode is scanned successfully.

Figure 3. Scanning a barcode

Once the barcode is scanned, the Delicious Library will query the Amazon.com web service for the details of the item. As the querying may take some time, you can continue scanning other items while it is waiting for the result of the last query (see Figure 4).

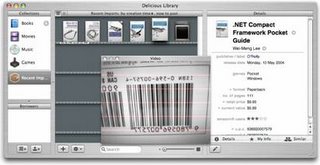
Figure 4. Fetching the information of an item from Amazon.com

Overall, I find the scanning very fun once you mastered the scanning process. However, there are at times where I had difficulty in scanning some books. If you do not have an iSight or a Webcam, I suggest you buy the Flic Bluetooth-enabled Scanner (see Figure 5) from Delicious Monster at a cost of $174.95 (when buying together with the Delicious Library license, which I think is a very reasonable price for a Bluetooth scanner). The best thing about using this scanner is that you can scan your books by going to them, rather than bringing all the books to the desk. This is especially useful if you have a large library and removing them from the shelves is too cumbersome. What’s more, even if you wandered beyond the 10 meters radius imposed by Bluetooth technology, the scanner has built-in memory enough to capture 500 barcodes which you can import into the Delicious Library when you are back to your desk.

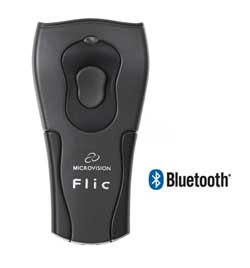
Figure 5. Using the Flic scanner together with Delicious Library

Besides scanning, you can also enter items the traditional way using the keyboard. Click on the Add a new item button at the bottom of the screen (see Figure 6) to add a new item.

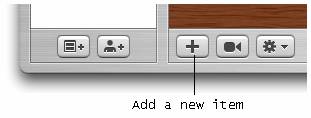
Figure 6. Adding a new item to your library

There are four methods for you to enter a new item (see Figure 7):

  • Search from Amazon.com

  • Enter the barcode of an item

  • Manually enter the item info

  • Scan using an iSight camera or Webcam

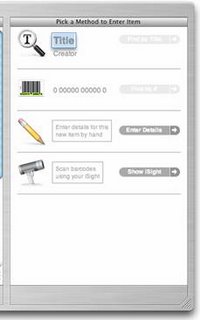
Figure 7. Various ways of adding an item

Searching for an item in Amazon.com is an easy way for you to add items to Delicious Library. Simply enter the title or/and author you want to search for and click on the Find by Title button located to its right (see Figure 8). When the result is returned, simply click on the “+” icon to add it to Delicious Library.

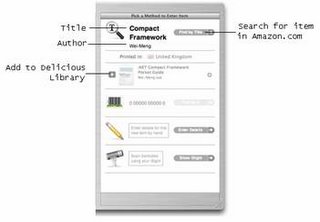
Figure 8. Searching for an item from Amazon.com

Once the items are scanned/entered, you can sort them according to a wide range of categories (see Figure 9). By default, the items are sorted by creator (e.g. authors).

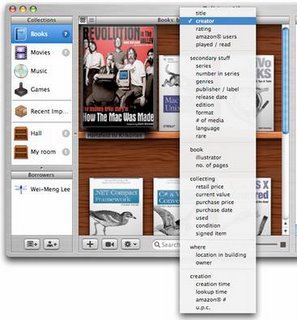
Figure 9. Sorting the items according to category

What made Delicious Library stand out from other application in the same genre is its amazing graphics effect. The cover image downloaded from Amazon.com is rendered to give it a realistic look, just like your real books (or DVDs) on the shelves. The Delicious Library can display your items (see Figure 10, 11 and 12) in a variety of sizes. The rendering of a DVD cover is most impressive (see Figure 12).

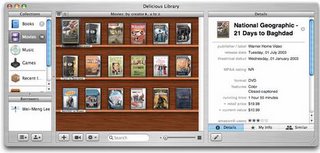
Figure 10. Displaying in the smallest size

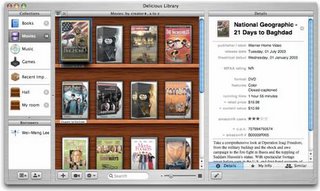
Figure 11. Displaying in small size

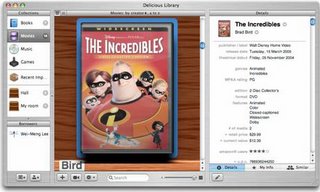
Figure 12. Displaying in the largest size

My only gripe with Delicious Library is that book covers are not displayed in the correct proportions. For example, the dimension of the book “Revolutions in the Valley” is 7.9x8, but Delicious Library displays it in the conventional rectangular format (see Figure 13), causing the image to be distorted. Also, sizes of all the books seem to be the same, which is definitely not the case in the real world. However, DVD does not face this problem as most DVDs are packaged in the same dimension.

You can also create virtual shelves that allow you to organize the location of your items. This is useful if you store your items in many different places, such as your study room, kitchen, etc.

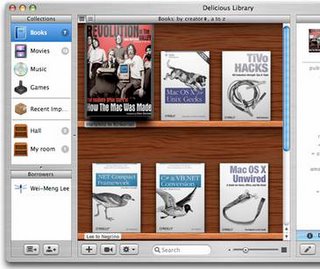
Figure 13. All the books are of the same size (the currently selected one is enlarged)

When you double-click on an item, you view an enlarged copy of its cover and on the right side of the window, there are three separate tabs:

  • Details – shows the detailed information of the selected item (see Figure 14).

  • My Info – allows you to enter your own comments pertaining to the selected item

  • Similar –explores other similar items from Amazon.com. You can purchase related items by clicking on the shopping cart icons next to each item (see Figure 15).

Figure 14. Viewing the details of a book

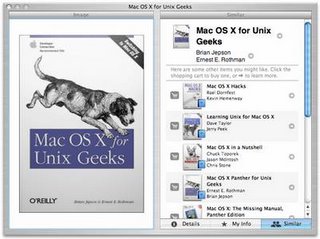
Figure 15. Viewing similar items

Another cool feature of the Delicious Library allows you to track borrower’s information. It integrates with Address Book to obtain user information. To indicate that an item is borrowed by a person, simply drag and drop the item onto the person’s name (see Figure 16). You can indicate the return date of the item by selecting the date on the right of the window (by default it is one week duration).

Figure 16. Tracking borrower’s information

When an item is overdue, it will be indicated on the book with a red stripe over the item (see Figure 17).

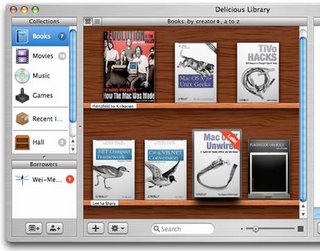
Figure 17. Late items are flagged

Final Thoughts

Overall, I like Delicious Library very much. It makes cataloguing your books and other collections such a fun thing to do. But what really makes the Delicious Library stand out is its innovative use of iSight (or Webcam) for barcode scanning, and its cool use of graphics really adds to the pleasure of using this application. Enough of this, I got to go and scan the rest of my library now!

Voice and Sound Recording on your iPod

Have you ever wanted to use your iPod for voice recording but were unwilling to shell out the extra cash for a third-party voice recorder? Well, in this article I am going to show you how you can turn your iPod into a recorder without needing to spend a dime. But it does require some work on your part (very minimal work, I assure you).

Apple’s firmware for the iPod does not come with any recording capability (unless you buy a third-party recorder). However that does not mean that you are stuck with this limitation forever. If you are limited by Apple’s firmware for the iPod, change it!

Recently I came across the iPodLinux project (
http://www.ipodlinux.org/Main_Page), an open source venture dedicated to porting Linux to the iPod. The iPodLinux project uses uClinux (http://www.uclinux.org/), a special variant of the Linux kernel that does not require a MMU (a memory management unit).

The cool thing about iPodLinux is that many additional applications have been written to run on the iPod, adding many capabilities not found in Apple's firmware. The iPodLinux replaces the UI of the iPod with 'podzilla' (
http://www.ipodlinux.org/Podzilla
), the default user interface for iPodLinux.

In this article, I will show you how to install iPodLinux onto your iPod and how you can use it to do voice and sound recordings. Note that iPodLinux is currently only supported on 1st, 2nd, and 3rd generation iPods. Fourth generation iPods (includes iPod Mini, U2, iPod Photo, and iPod Shuffle) support are upcoming, but not available at the moment.

Installation
You can download the various installers of iPodLinux for the different platforms – Linux, Windows, and Mac, from
http://www.ipodlinux.org/Installation.

For my case, I downloaded the Mac-version of the installer and Figure 1 shows the installer after the installer package was expanded.

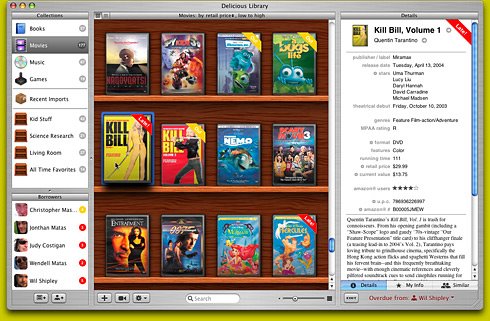
Figure 1. The iPodLinux installer

Before you actually start, you need to ensure that you have enabled your iPod for disk use. This can be enabled in iTunes->Preferences…->iPod (see Figure 2; check the Enable disk use check box).

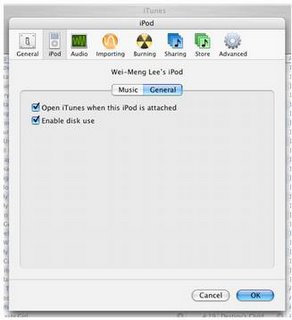
Figure 2. Enabling your iPod for disk use

Launch the iPodLinux Installer and select the iPod that is connected to your Mac (see Figure 3).

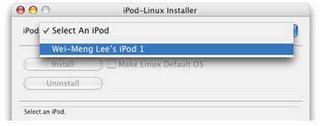
Figure 3. Selecting the iPod to install iPodLinux

To install iPod Linux onto your iPod, click the Install button (see Figure 4). Once installed, you have a choice to boot using iPodLinux, or the original iPod firmware (boots by default). If you want to boot iPodLinux by default, check the Make Linux Default OS checkbox.

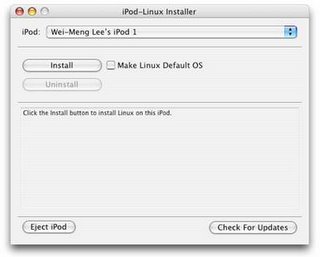
Figure 4. Installing iPodLinux

If the iPodLinux Installer complains that it is unable to install iPodLinux onto your iPod because of some unrecognized format error, you can solve this problem by “reformatting” your iPod using the iPod Updater (from Apple). However, be aware that when you use the iPod Updater, you are essentially destroying whatever content (and songs) you have on your iPod. Thus, remember to backup your iPod before you proceed. The iPod Updater can be downloaded from:
http://www.apple.com/ipod/download/. You can then use the iPod Updater to restore your iPod to the original factory setting by clicking on the Restore button (see Figure 5).

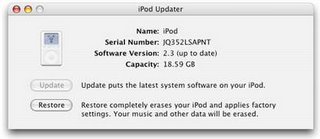
Figure 5. Restoring an iPod to its factory settings

You can now return to the iPodLinux Installer to install iPod Linux onto your iPod. When it is done, you should see the screen as shown in Figure 6 (note that my iPod’s name has been changed after a restore operation).

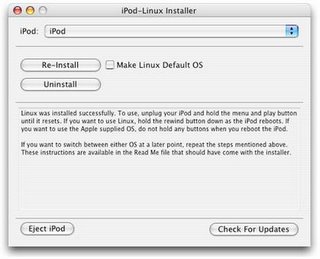
Figure 6. Successfully installing iPodLinux

To boot into iPodLinux, press and hold the Menu and Play buttons (1) at the same time and when the iPod is rebooting, press and hold the rewind button (2). Figure 7 shows the buttons combination.

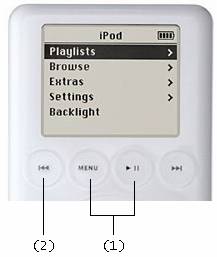
Figure 7. Buttons combinations for booting into iPodLinux

You should now see the Penguin logo on your iPod (see Figure 8), confirming that iPodLinux is installed successfully on your iPod.

Figure 8. iPodLinux booting

You will also see the familiar command line (for those Linux users), as shown in Figure 9.

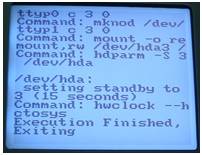
Figure 9. The command line interface of iPodLinux
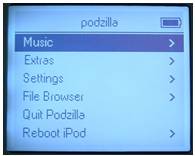
You should now see podzilla on the opening screen (see Figure 10). The UI looks very similar to Apple’s UI, but with some new functionalities beneath the menu.

Figure 10. Podzilla

Voice Recording
Recording is one feature that is sorely missing in iPod (unless you buy third-party accessories such as the iTalk). Using the iPodLinux, you can go to the recording feature by navigating to Extras->Recordings (see Figure 11).

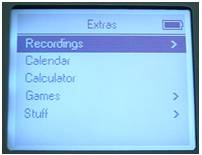
Figure 11. The Extras menu

You have two choices for recording – Mic Record (for use with a microphone) and Line In Record (for use with sound sources such as the audio-out port on your Mac). You can also select the sample rates – 8 kHz, 32 kHz, 44.1 kHz, 88.2 kHz, and 96 kHz (see Figure 12).

Figure 12. The Recordings menu

To record voice, you can connect an external microphone to the iPod headphones port and use the Mic Record option. Alternatively, if you do not have an external microphone, you can use your iPod earphones. Yes, this is not a typo; your earphones can be used as a microphone! My experimentation tells me that the left earphone record sounds much clearer than the right earphone. Try it on your own earphones and see if it works!

Once the voice is recorded, you can press the Menu button to return to the Recordings menu and select Playback to hear what you have just recorded. The recording is saved as a .wav file and the latest recording is listed at the bottom. Select the one you want to listen to and press the Action button (see Figure 13).

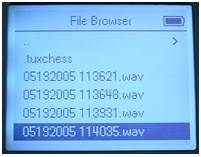
Figure 13. Playing back recorded sound

Transferring Songs from iPod to iPod
Besides recording voice, you can also transfer songs from one iPod to another. I tried playing a song on my iPod photo and then use a connector cable to connect it to my iPod (see Figure 14). The iPod records the song using the Mic Record method (the Line In Record method does not work). However the quality of the recording wasn’t that great – there was some hissing noise.

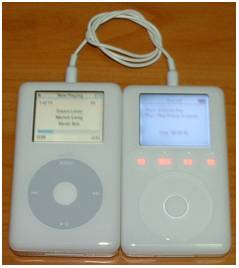
Figure 14. Transferring a song from iPod photo to iPod

However, you need to be aware of the legal issues when you are transferring songs using this method. You are essentially copying songs and so you need to ensure that you have the rights to do so.

Recording Radio to iPod
Another cool use of the recording feature of iPodLinux is for recording radio programmes. You can connect your iPod to the radio’s line-out port and then use the Line In Record method to record the radio programme. Besides the radio, recording directly from your Mac is another possibility. I tried playing a song in iTunes and then use my iPod to record through the line-out connector (again, you need to be aware of the legalities of doing this). The sound quality is pretty good and clear.

Summary
I hope you have a lot of fun using iPodLinux. Be sure to explore the other aspects of iPodLinux, such as games, and other cool applications located in the Extras menu. Have fun!